| Home Page | Order Information | Partners / Employmt. | |
| Products / Services | Freeware / Shareware | More ... | |
| Download Products | Resources / Links |
Practical software, services and solutions
for the small business
and the individual computer user - world
wide !
Practical MAIL MERGE -
an Introduction
[ For use with your data from "MyAddress &
Contact Data !" ]
[ All FIELD numbers used in this item are the actual field numbers in the table beginning with FIELD 1: ADDRESS_ID - not counting for example the column with the record no. When using "topscan.exe" please rely only on the actual field listing. Topscan works fine but sometimes doesn't represent the fields in the column corresponding to their correct position in the database table. ]
At first we want to make you aware of some important considerations related to the structure of our address book file which you can access via ODBC or after saving it as a ".csv" file or with topscan.exe.
FIELD 59 SALUT_LETTER
In this field you enter the FULL salutation you would use when you mail merge your address data with a word processing document in the language of your choice.
Examples:
Dear Mr. Miller
Sehr geehrte Frau Hendricks
Hello Michael
FIELD 60 SALUT_LABEL
In this field you enter the FULL salutation you would use on labels for mail outs in the language of your choice. This is quite different to the salutation you use in a personalised letter.
Examples:
c/- Mr. Simon Miller
z.H. Herrn Friedrich Heidenreich
In most address book applications, contact managers etc. we have found only a salutation field which allows for: Mr., Mrs. etc.
What is needed is to address people correctly, individually and in their native language.
When you perform a mail-merge with a word processor you normally define also the following merge fields in your document: SALUTATION and LASTNAME - for example ...
Dear <SALUTATION> <LASTNAME> =
Dear Mr Miller
etc.
Sehr geehrter Herr Miller (in German)
If you print labels (based on the same underlying data) then you would have printed on your labels:
Attn. Mr Miller
z.H. Herr Miller THIS IS NOT CORRECT
in German - correct is: z.H. Herrn Miller
If we have a look at the German version we see that there is an additional 'n' after the normal salutation in German ('Herr' stands for 'Mr'). There are many such small differences in various languages - this has made it necessary to have different formats for letters and labels:
Letter format: Dear Mr Miller
Sehr geehrter Herr Miller ( NO
'n' after 'Herr' )
Label format: Attn. Mr Miller
or: Attention Mr Miller
z.H. Herrn Miller
or: zu Händen Herrn Miller
When a mail-merge is performed you will then have always the correct salutation applied:
Instead of using something like:
Dear <SALUTATION> <LASTNAME>
in your document template you could simply use the field:
<SALUTAT_LETTER>
when you are printing labels - you could just use the field:
<SALUTAT_LABEL>
You can use any language - as long as you use a standard character set on your computer.
You can of course mix and match different languages in one address / label as much as you like. For example: a label or address printed in English but with the correct salutation in Spanish might look very professional under certain circumstances.
The approach we take is unique and many people have confirmed that it is the first time they have seen such a approach to deal with the facts accurately.
FIELD 61 indicates the address format.
You can choose during address entry to tick " B (for business)", "P (for private)" or "O for other)".
Depending on this you can print out letters and labels in an appropriate style for your target group. We suggest for BUSINESS recipients to use the following fields:
Mailing Instruction
FIELD 58 [ DISPATCH_INSTRUCT ]
Name/Company
FIELD 2 [ NAME_COMPANY ]
Salutation on Label FIELD
60 [ SALUTAT_LABEL ]
Position held
FIELD 48 [ POSITION ]
Postal Address
FIELD 19 [ POSTAL_ADDRESS ]
Suburb
FIELD 8 [ SUBURB ]
City
FIELD 9 [ CITY ]
Post Code / ZIP Code FIELD 10 [ POSTCODE ]
State, District etc.
FIELD 11 [ STATE ]
Country
FIELD 20 [ COUNTRY_NAME ]
For PRIVATE recipients :
Mailing Instruction
FIELD 58 [ DISPATCH_INSTRUCT ]
Salutation
FIELD 56 [ SALUTATION ]
Title
FIELD 49 [ TITLE ]
First Name
FIELD 5 [ FIRSTNAME ]
Middle Name Initials FIELD 7
[ MIDDLENAME_INITIAL ]
Contact Name
FIELD 4 [ CONTACTNAME ]
Postal Address
FIELD 19 [ POSTAL_ADDRESS ]
Suburb
FIELD 8 [ SUBURB ]
City
FIELD 9 [ CITY ]
Post code / ZIP Code FIELD 10 [
POSTCODE ]
State, District etc.
FIELD 11 [ STATE ]
Country
FIELD 20 [ COUNTRY_NAME ]
Based on these fields in your address book you can design mail merge letters and labels according to the postal requirements of most countries.
To give you some examples:
LUFTPOST
Herrn Dr.
Hans Berger
Hasenweg 18
8000 München Moosanger
Deutschland
By AIR MAIL
Mr
Jonathan Miller
24 Cavendish Drive
Bronte
Sydney 2000 NSW
Australia
The difference is obvious - in the German example the house no. comes after the street name and the postcode is in front of the city, then followed by the suburb and country.
Most of the advanced Word Processors offer MAIL MERGE facilities, however ....
... they are often NOT easy to use !
... it is not only the creation of the letter with merge fields to consider,
but also the address data
which should go into the merge fields (and here
in most cases the description of the mail
merge facilities lacks so fairly everything what
makes your task easier)
... we did not discover descriptions which were easy to follow (esp. by beginners)
- about how to create a form letter with merge fields
- in what precise format the data should be, apart from saying that
you can enter the data within the word processors facilities -
which is nonsense if you have the data already available
- as far as the use of external data goes it maybe says, that it could
be a .csv file (comma separated values), a text file or
ODBC; however all this leaves you as clever as before
if you have never had to deal with these subjects
... they require time consuming trial runs not to mention the 50 sheets
of paper or more until you
get the first page out properly
We will over time deal with the implications of many packages on the market - here we want to bring you closer an easy to use package to make mail merge really work for - right from the start !
What follows is a little bit lengthy (but we want to go with you step by step through all the procedures). However it is much, much shorter than walking through the Help File of your office solution not to mention the time and money you save !
(1) Install the Word Processor WORDWORTH on your machine into a folder: c:\wordworth
The latest version can be downloaded for FREE from their web site at: http://www.digita.com
(2) Create a subfolder below c:\wordworth and name it: data - for example: c:\wordworth\data
(3) Copy the file: addrbook.tps from the folder where you have installed your application - normally: c:\tbsc into the folder c:\wordworth\data. The reason for this is that you should NEVER - under no circumstances - operate on your original data outside the application !
(4) If not already done you should have installed the TOPSCAN utility and created a shortcut on your desktop
[ We had some difficulties with the installation of a newer version after download (on July 17, 2001) - so we stick in the meantime with the older version which we have got from a cover CD; it is perfect for this purpose. Maybe we have done something wrong during installation or it was discovered that we had already an older version on our computer - anyway: we will follow this up and report about it. This doesn't mean that the software itself is not great ! If you are interested in the older version please drop us a line by e-mail. ]
...
They also offer to download an ORGANIZER ( PIM = Personal Information Manager ) which we highly recommend. You can add some interesting supplements like in the real FILOFAX - most important: URLs and e-mail addresses can be entered and called directly from within the application. It is also FREE of charge.
...
After the first steps are done you should think about the design of your merge letter ...
What information from your address book database should go into it - the fields listed further up for business and for private address formats are a good example.
Having done this you can load WORDWORTH and select from an opening box (with the title: "Easy Start") the mail merge option and choose within the box: Letter - a sample opens.
You will see some sample merge fields - replace them with
«FIELD1»
«FIELD2»
«FIELD3» «FIELD4»
«FIELD5»
«FIELD6» «FIELD7» «FIELD8»
«FIELD9»
«FIELD10»
using the INSERT command from the EDIT menu, then select the MERGE FIELD option (you can replace 'n' in FIELDn with 1,2,3 etc.) if you want to have the address printed like in the following example:
By AIR MAIL
Mr
George Brown
West Road 8
Sydney 2000 NSW
Australia
Dear Mr Brown
this is the equivalent to the possible contents of the fields:
[ DISPATCH_INSTRUCT ]
[ SALUTATION ]
[ FIRSTNAME ] [ CONTACTNAME ]
[ POSTAL_ADDRESS ]
[ CITY ] [ POSTCODE ] [ STATE ]
[ COUNTRY_NAME ]
[ SALUTAT_LETTER ]
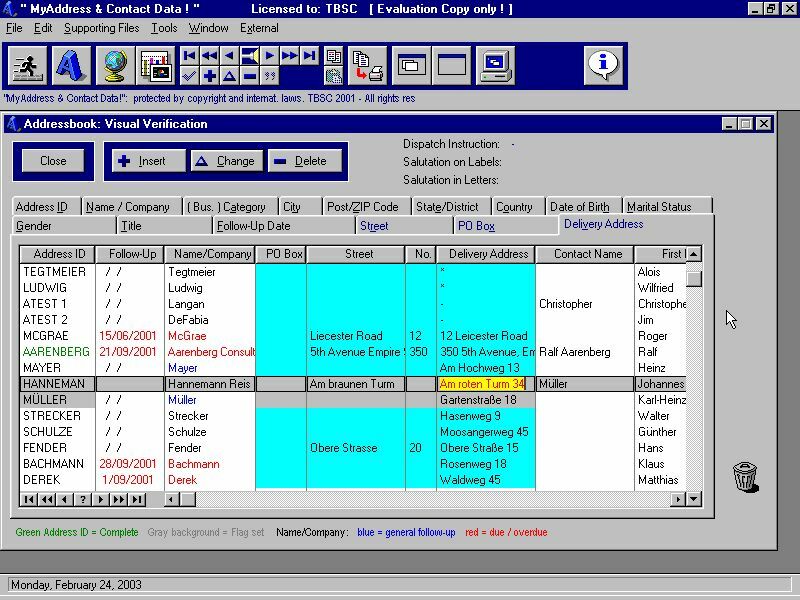
Now before we do the allocation of the actual fields to our merge fields it is a good idea to check the quality of your data in the address book file in your application.
Start "MyAddress & Contact Data" and select: Addressbook: Visual
Verification from the EDIT Menu.
You can edit the fields in place - maybe some entries are missing, incomplete or just wrong !
If you have discovered some irregularities please correct them and then copy the file: addrbook.tps to the "data" folder in your WORDWORTH folder before you continue.
OK - so far so good.
Now the next step:
Start the TOPSCAN application (topscan.exe) accessible from the File Menu (Database Scanner ) - and open the file addrbook.tps in your folder: c:\wordworth\data
If you have not downloaded the TOPSCAN Utility from our web site - you can do it now: TOPSCAN Utility
NEVER operate on your original data !!!
Within the TOPSCAN application select from the COLUMN menu SHOW/HIDE, then SELECT ALL (button down on the left) and click OK; you can also select AUTOFIT ALL. Now according to the field structure above you should shift all the columns you need for your mail merge to the LEFT - this means to locate at first the column: DISPATCH_INSTRUCT. Highlight the first field in this column and click the SHIFT COLUMN LEFT button as long as it takes to move the column to the far left into the first position (1 -left of Record No.) - this will be your mail merge <<FIELD1>>. Then locate the column SALUTATION and move it to the left between DISPATCH_INSTRUCT and Record No. (this will become your merge <<FIELD2>> and so on .... until you have all 10 fields in the right column position reflecting the structure of the merge fields in your planned letter.
[ The column numbers might NOT reflect the actual position in the database table - but it works fine. If you lookup the field no. in your field listing for the file: addrbook.tps and compare them to the column position shown in TOPSCAN they differ sometimes. But this doesn't matter for our purposes here. ]
[ You can RESET the columns to the DEFAULT from the EDIT menu. ]
Having all the needed columns in the right order representing the merge fields you can go again through the columns and make changes if required. Please keep in mind that these changes are made in a copy of your original database - you also might want to update your original now or at a later stage by making some notes (it is always better to do it from within the application - nothing is then forgotten).
Next we go in TOPSCAN into the FILE menu and select EXPORT.
The export file could be named: addrbook.txt - put it for practical reasons into the same folder as the addrbook.tps file ( c:\wordworth\data\ ]. Select Tab, UN-TICK Quotes, UN-TICK Create Titles and click OK. Your export file: addrbook.txt will be created.
Back to WORDWORTH ...
Go to TOOLS and select MAIL MERGE
Use BROWSE to select the file: addrbook.txt
UN-TICK the Box: File contains Header Record
Select File Format: Wordworth
ASCII Field Separator: Tab
ASCII Record Separator: Line Feed
and then click on PRINT - your mail merge letters are created !
[ if you choose to PRINT TO FILE in the print dialog your output is
send to a file with the ending .prn from where you can inspect the letters
before printing them out ]
S0 - THIS WAS THE MAIL MERGE. We have done it often this way and it worked without complications. If you do it exactly as described it will work for you too !
Some notes and personal remarks:
The reason why we are using a word processor in an office environment is to automate some tedious tasks like mail merge and label printing. Otherwise we could stick with the old fashioned type writer. Let's be quite clear about one thing: whatever word processor software you are using in an office environment is fairly irrelevant for the average user anyway.
We think with our approach, tools and explanations we come closer to what an "office" solution (or whatever the word creation is nowadays) actually should be.
[ And then we still have a book with more than 600 pages:
Getting Results with "xxxx"
when using "xxxx" - nice try (but didn't
offer any business related practical help for our target group. ]
It is like hitting a nail into the wall with a hammer (one of these lovely analogies: the "nail" is the letter, the process of "hitting" is the typing process at the keyboard and the "hammer" is equivalent to your PC Hardware and Software (Word Processor).
Now you decide for yourself what is important and contributes to your business - we think it is the NAIL (= your business letter). If you - as the human being involved - can't create the right letter to convince your customers (comparable to driving the nail into the wall) - then we can't help nor can your PC, printer and word processor software.
Worth thinking about before you run into the next upgrade !
Some more details we want to mention:
There are several possibilities how to place the merge fields in a document and often these placements depend on country specific style and format considerations we have to take into account.
Samples:
Herrn Rechtsanwalt
oder: Herrn
Johannes Strecker
Johannes Strecker
Waldstraße 49
Rechtsanwalt
Waldstraße 49
8000 München-Grünwald
8000 München-Grünwald
Mr
Johannes Strecker
Barrister & Solicitor
Waldstraße 49
8000 München-Grünwald
"Rechtsanwalt" = lawyer (general) in English (barrister, solicitor are more specific) is a TITLE you can place in a German address in several positions. This should be considered when creating mail merge letters and inserting the merge fields.
Herrn Rechtsanwalt is OK in German; but NOT Mr Barrister
& Solicitor Strecker in English.
You can skip empty fields if you want to - however you must be sure that they are empty. For example: the field TITLE has as default setting a hyphen "-" but we are encouraging you to use the TITLE list, define new titles etc. to have good quality data. If there is no title for a person then a hyphen is stored in the TITLE column. This can be easily removed when doing the Address Book Verification as mentioned before (you can also use the 'mass update' function in TOPSCAN to replace single or all values in a column). A similar situation can occur with the column POSITION. In these cases and when the field is actually empty you can use the <<:SKIP>> <<:ENDSKIP>> construction to avoid gaps.
Description:
«:SKIP», «:ENDSKIP» These two command precede and follow a group of field names where you want the empty fields to be filled with the contents from the following field. This is useful for addresses where some fields in the address could be empty and you do not want gaps in the middle of the address.
There are many so-called "office" packages or "suites" on the market:
MS-Office
(commercial package)
LOTUS Smart Suite (commercial package, but
also often distributed as promotional tool when buying a new PC)
...............................
Star Office
(not tested regarding mail merge so far)
Software 602
(excellent choice - but not tested regarding mail merge so far)
and some others.
As far as the mail merge facilities are concerned we have compared the two major commercial packages (MS-Office and LOTUS Smart Suite - both the '97 versions).
What can we say ... LOTUS Smart Suite is soooo.... easy to use ! Just create a NEW document, from the TEXT menu choose MERGE and then LETTER. This opens the MAIL MERGE ASSISTANT - you select the data(source) you want to merge, insert the merge fields and then click on merge, view and print.
The LOTUS Smart Suite was often given away as a promotional tool when buying a new PC. So if you have it: it is worthwhile to give it a go !
Your data source could be in the form of:
(1)
A plain .txt file - after exporting it with the TOPSCAN utility to: addrbook.txt or exporting it from within "MyAddress & Contact Data!". What is different to the approach with WORDWORTH is that the data has to be stored from within TOPSCAN as "comma separated" data and you should leave the tick in the boxes left of: Quotes and Create Titles.
(2)
ODBC Data
This allows you to access your data in a copy of the original file after
setting up ODBC on your machine. It is a good idea to copy the file: addrbook.tps
to your \work folder in Lotus Smart Suite ( c:\lotus\work\ ) and set up
ODBC for this file as a new data source. See also our web site for more
information about ODBC and how to implement it. You probably have installed
LOTUS Word Pro by selecting the TYPICAL installation feature. To use ODBC
you have to go through the installation process again and select the CUSTOM
installation feature, then tick ODBC in the tab dealing with database files.
The next step is entering the merge fields - which is so easy with the Mail Merge Assistant (similar to WORDWORTH).
The rest is fairly self-explaining.
Word processing and esp. the important mail merge are handled with the LOTUS Smart Suite in a professional manner which is especially suitable for the novice user.
As far as MS-Office is concerned:
We are still trying to find out about an easy way how to do a "simple" mail merge with our data using the packages' word processor (this is esp. important for those who are new to computers, run a small business or doing it for the first time!. We will keep you posted.
However we have to say: it has taken us just two (2) minutes to create a perfect mail-merge with the LOTUS Smart Suite (and we haven't done it before with this suite). The other parts of LOTUS Smart Suite are similar convincing - see the documents at our web site.
As far as STAROFFICE and the product from software602 are concerned:
BOTH are FREEWARE packages !
We have not tested them specifically for their mail merge features but we will do this and put our experience in writing right in this space. What we have seen so far is that STAROFFICE is a huge package which certainly has its features, but it slow on lower level Pentiums.
The office suite from www.software602.com
is just excellent - what else can we say; and it is also FREE ! We will
report about the mail merge features offered in due course.
Label Printing is a subject similar to Mail Merge - see also the documents at our web site.
We have listed at the end of the next item the standard label sizes for AVERY Labels sold in North America and in Europe (plus other parts of the world). Useful to check out the label sizes if you want to use WORDWORTH, LOTUS Smart Suite etc. to print out labels.
======================================================================
We have encl. some appendices from several packages - this makes it
easier for you to see our explanations in context with what the software
manufacturer has to say.
Appendices:
from the WORDWORTH Help File
Create personalized letters or labels
Personalizing letters or labels involves two steps.
1) Creating or finding the database file that contains the addresses,
2) Creating the document that will be merged with the database (the
form letter).
Step One
Creating the database of names
Choose New (File menu) and select Normal to create a new blank document
Type each field of information (part of the address) separated by a
Tab character
Press Enter at the end of the record (address) and repeat the previous
step and this step until all the addresses have been created
For example ( is a tab character and is a paragraph mark):
Jones Black Horse House Albion
St Exmouth
Smith 10 The Mews
Exeter
When finished, choose Save As (File menu) and select Text Document from
the Save As Type pop-down list
Step Two
Creating the form letter
Choose New (File menu) and select Normal to create a new blank document
Create the document as you would like it to appear on all letters
Insert into the main document, special instructions called merge fields
that tell Wordworth where to print information from the database. When
you Mail Merge the document, these merge fields will be replaced by information
from the database.
Choose Insert (Edit menu), select Merge Fields and click Insert
Select the appropriate fields («FIELD#») into the document as necessary
The fields that need inserting are the fields in the database. If for example, the database contains the following data:
Jones Black Horse House Albion
St Exmouth
Smith 10 The Mews
Exeter
The fields you would need to insert into the document are:
«FIELD0» Which would be replaced with Jones, then Smith
«FIELD1» Which would be replaced with Black Horse
House, then 10 The Mews
«FIELD2» Which would be replaced with Albion St,
...
«FIELD3» Which would be replaced with Exmouth, ...
Step Three
Producing the personalized letters
Once the database and form letter have been created the letters can be printed:
Open the form letter and choose Mail Merge (Tools menu)
Click Browse and select the database saved in step one
Deselect the File Includes Header Record checkbox
Type "Tab" in the ASCII Field Separator and type "Return" in the ASCII
Record Separator controls
Click Print to print letters for all the addresses in the database
See also
Inserting mail merge fields
Digita Wordworth Guide, Copyright ©1997 Digita International Limited. All Rights Reserved.
-----
Inserting mail merge fields
You can insert mail merge fields into the current document.
Choose Insert command (Edit menu)
Select the Merge Fields option and click Insert.
Double-click an entry in the list to insert it at the position of the
insertion point and leave the dialog open.
Select an item in the list and click Insert to insert it at the position
of the insertion point and close the dialog.
There are several selective commands you can use while mail merging (they are enclosed in chevrons (« or ») and preceded by a colon (:) to distinguish them from normal fields). These commands allow you to skip certain fields or records, and even perform condition testing for querying the data.
Command Use
«FIELD0» ... «FIELDn» Insert the n field from the database file. Starting at 0.
[ it works fine when starting with FIELD1 !!! ]
«:NEXT» Skips to the
next record in the database. It is useful when printing more than one record
on a page (like printing a
sheet of address labels).
«:SKIP», «:ENDSKIP» These two command precede and follow a group of field names where you want the empty fields to be filled with the contents from the following field. This is useful for addresses where some fields in the address could be empty and you do not want gaps in the middle of the address.
«:STOP» Stops the printing of the document.
«:IF "field" = "value"» Only proceeds if the "field" matches the "value".
«:IF "field" = "value" NEXT» Will skip to the next record
if the "field" contents match the "value".
«:IF "field" = "value" STOP» Will stop the printing of
the document if the "field" matches the "value".
Other operators that can be used in place of the equals:
Operator Means
<= (or =<) Less than or equal to
>= (or =>) Greater than or equal to
<> Does not equal
< Less than
> Greater than
Note: All comparisons are case insensitive.
See also
Create personalized letters or labels
Digita Wordworth Guide, Copyright ©1997 Digita International Limited.
All Rights Reserved.
Label sizes from the AVERY Product Help File:
From the AVERY Product Help File
Laser Address Labels
Avery offers a variety of Laser Labels for all your addressing and shipping needs.
The products listed below are available in Europe and other parts of the world.
Clear Laser Labels
Designed to virtually disappear on white, patterned or colored envelopes, Clear Laser Labels make mailings look more professional. Available in seven sizes, they're ideal for addressing, shipping, reminders and return addressing.
Product Code Size in mm Labels per sheet
L7551 Mini Address 38,1 x 21,2 65
L7552 Petite 55 x 12,7 20
L7553 Petite 22 x 12,7 48
L7560 Address 63,5 x 38,1 21
L7562 Address 99,1 x 33,9 16
L7563 Address 99,1 x 38,1 14
L7565 Parcel 99,1 x 67,7 8
White Laser Labels
Are ideal for all addressing, return addressing and shipping applications. Available in 12 sizes, the professional-looking labels are compatible with both laser and ink jet printers.
Some products may also be available in additional quantities (40 sheets and 250 sheets packs). See your local dealer or phone the Avery Consumer Service Center for details.
Product Code Size in mm Labels per sheet
L7159 Address 64 x 34 24
L7160 Address 63,5 x 38,1 21
L7161 Address 63,5 x 46,6 18
L7162 Address 99,1 x 33,9 16
L7163 Address 99,1 x 38,1 14 (predefined in WORDWORTH)
L7164 Address 63,5 x 72 12
L7165 Parcel 99,1 x 67,7 8
L7166 Parcel 99,1 x 93,1 6
L7167 Shipping 199,6 x 289,1 1
L7168 Shipping 199,6 x 143,5 2
L7169 Parcel 99 x 139 4
L7173 Shipping 99,06 x 57 10 (most suitable from our point
of view)
Colour Laser Labels
Add impact and style to envelopes and packages, file folders and special announcements with Avery Colour Laser Labels.
Product Code Size Labels per sheet
L7263 Yellow Fluorescent 99,1 x 38,1 14
L7630 White Round 63,5 diameter 12
L7670 Yellow Round Fluor 63,5 diameter 12
L7680 Mini Address Gold 38,1 x 21,2 65
L7690 Mini Address Silver 38,1 x 21,2 65
Some listed products may not be available in your area.
---------------------------------------------------------------------------------------------
AVERY Product List (North America) - from their Help File av-prod.hlp
Laser Address Labels
Avery offers a variety of Laser Labels for all your addressing and shipping needs.
The products listed below are available in North America.
Clear Laser Labels
Designed to virtually disappear on white, patterned or colored envelopes, Clear Laser Labels make mailings look more professional. Available in six sizes, they're ideal for addressing, shipping, 35 mm slides, reminders and return addressing.
Product Code Size Labels per sheet
5667 - Return Address 1/2" x 1-3/4" 80
5660 - Address 1" x 2-5/6" 30
5661 - Address 1" x 4-1/4" 20
5662 - Address 1-1/3" x 4-1/4" 14
5663 - Address/Shipping 2" x 4-1/4" 10
5664 Shipping 3-1/3" x 4-1/4" 6
Avery Colors Fluorescent and Pastel Laser Labels
Add impact and style to envelopes and packages, file folders and special announcements with Avery Colors. Available in three dynamic fluorescent colors -- magenta, green and yellow, and three sophisticated pastels -- blue, canary and lavender.
Product Code Size Labels per sheet
5970 Magenta Fluorescent 1" x 2-5/6" 30
5971 Green Fluorescent 1" x 2-5/6" 30
5972 Yellow Fluorescent 1" x 2-5/6" 30
5980 Blue Pastel 1" x 2-5/6" 30
5981 Canary Pastel 1" x 2-5/6" 30
5982 Lavender Pastel 1" x 2-5/6" 30
White Laser Labels
Are ideal for all addressing, return addressing and shipping applications. Available in 10 sizes, the professional-looking labels are compatible with both laser and ink jet printers.
Ink Jet Compatible
Product Code Size Labels per sheet
5167 - Return Address 1/2" x 1-3/4" 80
5267 - Return Address 1/2" x 1-3/4" 80
5160 - Address 1" x 2-5/8" 30
5260 Address 1" x 2-5/8" 30
5161 - Address 1" x 4" 20
5261 Address 1" x 4" 20
5162 - Address 1-1/3" x 4" 14
5262 - Address 1-1/3" x 4" 14
5163 - Address/Shipping 2" x 4" 10 (most
suitable from our point of view)
5263 - Address/Shipping 2" x 4" 10
5164 - Shipping 3-1/3" x 4" 6
5264 - Shipping 3-1/3" x 4" 6
5920 - Address 1" x 2-5/8" 30
5922 - Address 1-1/3" x 4" 14
5923 - Shipping 2" x 4" 10
5927 - Return Address ½" x 1-3/4" 80
5930 Address 1" x 2-5/6" 30
5932 - Address 1-1/3" x 4-1/4" 14
Some listed products may not be available in your area.
End of Mail Merge item
| Home Page | Order Information | Partners / Employmt. | |
| Products / Services | Freeware / Shareware | More ... | |
| Download Products | Resources / Links |
Practical software, services and solutions
for the small business
and the individual computer user - world
wide !